Industries such as biotechnology count on accreditation to assure flow control calibration accuracy
Any instrument that measures and controls fluid flow needs to be calibrated—upon initial manufacture and then periodically recalibrated to ensure accurate measurement and control. Calibration of flow measurement and control equipment on high-precision metrology systems is essential for instrumentation manufacturers like Brooks Instrument. In fact, increased regulation in industries like biotechnology manufacturing put even greater demands on instrumentation manufacturers to document their known uncertainties through certifications.
For example, in biotechnology process systems, mass flow controllers (MFCs) control delivery of process gases such as oxygen and carbon dioxide to bioreactors. The accurate and repeatable delivery of precise amounts of these gases is one of the variables that process managers seek to measure and manage, to help them maximize bioreactor yields, efficiency and uptime.
Importance of ISO/IEC 17025
One of the most important certifications is ISO/IEC 17025 accreditation. ISO/IEC 17025 was first issued in 1999 by the International Organization for Standardization (ISO) and the International Electrotechnical Commission (IEC). It’s an important standard for calibration and testing laboratories around the world. Laboratories that are accredited to this international standard have demonstrated technical capability, which includes being able to produce precise and accurate test and/or calibration data.
Accreditation is a voluntary, third-party review process. As part of accreditation, a laboratory's quality management system is thoroughly evaluated on a regular basis to ensure continued technical compliance with ISO/IEC 17025. During the accreditation process, each calibration system is evaluated, and all factors impacting system Calibration and Measurement Capability (CMC) are considered.
For an instrumentation company like Brooks Instrument, maintaining a high degree of in-house technical skill and expertise in metrology is an essential component to the precise performance, accuracy and reliability of our instruments.
ISO/IEC 17025 accreditation signifies that a company understands the accuracy of its products and the uncertainty in its metrology systems. To be clear: “uncertainty: is not a bad thing in metrology, if you recognize and fully appreciate it. To explain this, it can be useful to explore some of the top measurement uncertainties encountered in metrology systems while specifically calibrating mass flow controllers, and the statistical analyses that Brooks Instrument performed to meet ISO/IEC 17025 requirements.
ISO 17025 and Measurement Uncertainty
Within the field of metrology, there is a fundamental principle called “uncertainty,” which basically states that by measuring and documenting the uncertainty factors in a given metrology system, it is possible to state the accuracy of that metrology system and the accuracy of the instruments calibrated using that system.
Measurement uncertainty is the clear and unambiguous description of calibration results. Measurement uncertainty usually states that the measured value is inside a well-grounded section of the measurement range with an acceptable probability. By “acceptable” we mean that this interval is typically stated at a 95% confidence level, which is equivalent to the coverage factor (k) = 2 for a normal distribution.
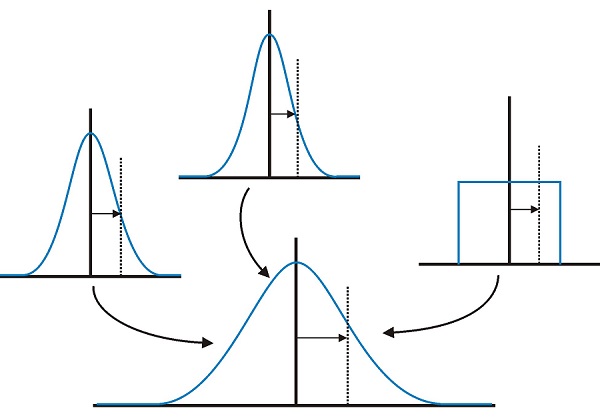
By “well-grounded” we mean that the measurement process is thoroughly mapped and takes into account every factor that affects it. And, not just the factors but also the magnitude of them. In the end, from all of these elements, which have numerous types of probability distribution, such as those shown in Figure 1, and with the help of the central limit theorem, we get a combined standard uncertainty.

Fig 1. Example of a combined standard uncertainty from various types of probability distribution
During the ISO/IEC 17025 accreditation process, approximately 30 different items are specified in the so-called “uncertainty budget.” Some of these factors can have a very low impact on the final outcome; others can be arranged into groups with similar effects to reach a significant level.
These kinds of evaluations give us a chance to observe the major causes of uncertainty in flow meters. Let’s look at the top five reasons:
- Volume of the reference meter: That’s why it’s so important to calibrate flow meters with an expert calibration laboratory, one that has a small Calibration and Measurement Capability (CMC) value in the range of the meter.
- Temperature of the medium/gas before the reference volume meter: It’s crucial to have accurate and fast response information about the temperature.
- Temperature of the medium/gas before the Device Under Test (DUT): It’s important to measure temperature in more than one place during the calibration, since the measurement system is built from different kinds of materials that have different thermal inertia; even small fluctuations can cause changes in the homogeneity of the system. This is why room temperature is controlled so tightly in the laboratory.
- Time measurement: During calibration we use a volumeter. The piston in that device rises and we collect an amount of gas. We measure how long it takes (time) for that piston to rise - the accuracy of the time measurement is part of the uncertainty.
- Measurement of output signal (flow) on the DUT: The measurement systems and any inaccuracy in those systems is another contributor to the overall uncertainty.
It’s also important to maintain the reliability of the metrology systems. To achieve these goals, the flow standards used on metrology systems that calibrate Brooks Instrument mass flow controllers are routinely checked and periodically certified by accredited laboratories. These laboratories have standards that can be traced to internationally recognized institutes, such as the National Institute of Standards and Technology (NIST).
For manufacturers like Brooks Instrument, there are significant advantages to understanding how the inherent uncertainty of metrology systems used to calibrate flow control and measurement products affects their accuracy. Most importantly, it helps ensure that OEMs and end users of these devices can rely on the measurements and results these instruments provide in their processes.
This “certainty” about uncertainty ultimately enables better understanding, control and documentation of process performance, quality, yield and productivity in complex and highly technical systems that need precise control and accurate measurement of process variables.
To learn more, download our eBook: Understanding MFC Metrology & Calibration.